Tracheostomy
A percutaneous tracheostomy is a relatively common intervention on the ICU in patients with prolonged ventilation.
It is now more commonly performed than the surgical technique (in the UK).
They can be very helpful for patients in critical care, but are not without their risks.
It is now more commonly performed than the surgical technique (in the UK).
They can be very helpful for patients in critical care, but are not without their risks.
This Youtube video from Crit IQ provides a nice introduction
Indications
- Prolonged ventilation to facilitate weaning
- Secretion management
- Airway protection
- Upper airway obstruction
As it isn’t passing through the very sensitive vocal cords, a tracheostomy is generally better tolerated than an oral endotracheal tube (OETT).
This can allow better weaning of sedation and forward progress in a patient's care.
The shorter length of a tracheostomy also provide better flow characteristics (see Poiseuille's Law), which can aid patients with their respiratory wean by reducing the work of breathing needed to overcome tube resistance.
Prolonged presence of a OETT also increases the risk of damage to the vocal cords, which is increasingly likely after 7 days.
A tracheostomy also provides a patent, protected airway in those patients that may be unable to do this themselves.
This includes patients with neurological condition impeding airway protective reflexes, and both acute and chronic upper airway pathology e.g. airway trauma, airway tumours.
Alongside this, a tracheostomy allows passage of a suction catheter to aid with management of secretions. This can be more long term in those with a poor cough, or as part of helping a patient’s weaning process from acute illness.
Contraindications
Some of these may be more relative.
- Difficult anatomy
- Unstable C-Spine
- Unstable physiology (primarily respiratory)
- Coagulopathy
Some aspects of the patient’s anatomy may make a percutaneous approach unsuitable, as it is a blind technique.
This includes; obesity, short neck, congenital abnormalities
The forces needed for insertion of a percutaneous tracheostomy a fairly significant, and if there is C-spine instability, these forces can worsen this.
IKf this would be detrimental to the spinal cord, a surgical approach would be safer.
The process of inserting a tracheostomy involves a not insignificant period of impaired ventilation as the transition between airways occurs.
This almost invariably results in some derecruitment and deterioration in respiratory status, and thus a degree of stability is required.
Recommended parameters include:
As a blind technique, avoidance of damage to blood vessels can be hard.
Similarly it may be difficult to control if it occurs.
Adequate haemostatic function should therefore be present to minimise the risks associated with bleeding.
This includes; obesity, short neck, congenital abnormalities
The forces needed for insertion of a percutaneous tracheostomy a fairly significant, and if there is C-spine instability, these forces can worsen this.
IKf this would be detrimental to the spinal cord, a surgical approach would be safer.
The process of inserting a tracheostomy involves a not insignificant period of impaired ventilation as the transition between airways occurs.
This almost invariably results in some derecruitment and deterioration in respiratory status, and thus a degree of stability is required.
Recommended parameters include:
- FiO2 < 60%
- PEEP < 10 cm H20
As a blind technique, avoidance of damage to blood vessels can be hard.
Similarly it may be difficult to control if it occurs.
Adequate haemostatic function should therefore be present to minimise the risks associated with bleeding.
Percutaneous Tracheostomy Insertion
There are a number of different tracheostomy kits available and a few variations in technique.
This covers some of the basic concepts.
This covers some of the basic concepts.
Preparation Before
- Confirm indication
- Assess for contraindications
- Difficult anatomy - US scan of neck is increasingly being used to assess for vessels
- Check clotting profile, platelets and anticoagulants
- Check physiological stability of patient
- Difficult anatomy - US scan of neck is increasingly being used to assess for vessels
- Consent - often not possible with patient, but should be discussed with next of kin.
- Prepare and check equipment - tracheostomy kit, bronchoscopy kit, airway kit, drugs, monitoring
Preparation of Patient
- Ensure adequate analgesia, anaesthesia and muscle relaxation
- Ventilation with FiO2 1.0
- Position patient - extension of neck is needed. Often a sandbag is placed beneath the shoulders.
- Identification of anatomy beforehand - identify the cricoid cartilage and sternal notch. Approxi midpoint will be around the 2nd/3rd tracheal ring border.
- Airway adjustment - withdrawal of OETT under direct vision to position cuff just between cords. Alternatively and LMA could be used.
- Set up bronchoscope for procedure.
Tracheostomy Insertion
- Full surgical sterility - gown, gloves, mask, hat, drapes.
- Prepare skin - clean with alcohol with 2% chlorhexidine and allow to dry. Cover area with fenestrated drape
- Reidentification of anatomy and planned site.
- Infiltrate skin with lidocaine with adrenaline - reduces sedation requirements and provides vasoconstriction to reduce bleeding.
- Insert needle into trachea - below cricoid cartilage, ideally between 2nd and 3rd tracheal rings. Aim for 90 degree angle with the skin, holding trachea with non-dominant hand.
- Aspirate to confirm location - continuously aspirate (syringe with 2ml saline) with air confirming puncture of the trachea. This can be visualised with the bronchoscope.
- Inserted guidewire - remove syringe and pass wire down needle, visualising wire with bronchoscope.
- Remove needle
- Skin incision - with a blade, nick the skin to allow easier passage of dilators. Doing this in the midline minimises damage to deep structures (although horizontal cuts have better cosmetic results).
- Insert short initial dilator - follow the path of the wire to avoid kinking. Movement should be easy
- Insert tapered dilator - a thin inner white tube stiffens the wire to prevent kinking. There will be markings to align this correctly. The white tube and dilator are pushed in together in a rotating, caudal manner to curve into the trachea. Stop when the black line is reached.
- Pause to allow some dilation
- Remove dilator - leave white inner tube in place to aid tracheal tube insertion.
- Insert tracheal tube - align the tube with the mark on the inner tube. Insert in a similar smooth, slightly caudal movement.
- Remove guide wire and inner white tube.
- Inflate tracheal cuff
Confirm Placement
This must be done immediately after insertion:
This must be done immediately after insertion:
- Bronchoscopy - Looking down the tracheal tube with the bronchoscope should confirm a tracheal position and allow estimation of distance from the carina.
- Ventilation with a hand bag should confirm:
- Good chest movement
- Capnograph trace
- Tactile feedback.
- Good chest movement
- Chest x-ray - this isn’t mandated but can help confirm position of the tube and any complications (rare in a straightforward insertion).
This video from Jonathan Sanah provides quite a good review of the process:
Complications
Immediate:
- Bleeding - reduced by injection of adrenaline, and less than with an open technique. Larger vessel bleeding can be tamponaded by the tube.
- Misplaced tube/false passage
- Barotrauma e.g. pneumothorax - may result from misplacement of the TT in the pretracheal space. There may also be surgical emphysema.
- Respiratory deterioration - from transient impaired ventilation and de-recruitment.
- Loss of the airway - This can occur during the repositioning of the OETT.
- Oesophageal injury - from damage to posterior tracheal wall. Rare but could involve tracheo-oesophageal fistula. This may also be delayed.
- Nerve damage - very rare
Delayed:
- Tube blockage - e.g. with secretions.
- Tube displacement
- Infection - either locally or pneumonia
- Bleeding - there can be erosion through local blood vessels
- Ulceration - of local skin or mucosa
Late (> 7days)
- Tracheomalacia
- Granulomata of the trachea
- Haemorrhage
- Tube blockage
There are some important physiological changes that occur which are important to bear in mind:
- Reduced anatomical deadspace - can be by as much as 50%. Often a beneficial effect.
- Loss of innate humidification - can cause problems with secretion thickness and mucosal changes if not managed.
- Loss of speech - variable depending on the clinical scenario.
- Impaired swallow - the cuff impacts on swallowing muscle function
Types of tracheostomy tube
There is a very wide range of different tubes in use.
The factors which vary include:
The factors which vary include:
- Diameter
- Length (fixed vs variable)
- Cuffed vs uncuffed
- Inner cannulae
- Fenestrations
- Material (flexible vs rigid vs metallic)
Some patients (e.g. post laryngectomy) may have a stoma without a tube.
The common ones encountered include:
The common ones encountered include:
Standard Tracheal Tube (Portex)
- Plastic, pre-formed curve
- Cuffed
- Variable diameter (ID from 6.0 to 9.0)
- No inner cannula, but can be added
- Non fenestrated
Inner Cannula
These can be added to tracheal tubes.
The advantage is that they can be removed regularly and cleaned of secretions which might otherwise build up and cause obstruction.
The cost of this is loss of internal diameter and increased resistance to airflow.
These can be added to tracheal tubes.
The advantage is that they can be removed regularly and cleaned of secretions which might otherwise build up and cause obstruction.
The cost of this is loss of internal diameter and increased resistance to airflow.
Fenestrated Tube
Holes at the upper surface allow air to pass through the vocal cords, thus allowing vocalisation (this is encouraged if the tracheostomy is occluded transiently).
It also allows increased airflow to occur, thus decreasing work of breathing and aiding weaning.
Positive pressure ventilation isn’t possible through this type of tube.
Also, the airway isn’t protected from aspiration.
A non fenestrated inner cannula can convert the tube to a non-fenestrated function
Adjustable flange
The hub on this tracheostomy tube can be released and moved to change the length of the internal aspect of the tube.
This allows modification of the length in cases where a standard tube would be too short e.g. obese patients.
This hub must be very carefully locked to ensure movement doesn’t occur.
The hub on this tracheostomy tube can be released and moved to change the length of the internal aspect of the tube.
This allows modification of the length in cases where a standard tube would be too short e.g. obese patients.
This hub must be very carefully locked to ensure movement doesn’t occur.
Mini-tracheostomy
A very small tracheostomy tube (ID 4.0) can be used.
Though it has minimal use for ventilation (except in emergency oxygenation) it can allows a suction catheter to be passed to aid with suction clearance.
They can be used in de-escalating from a tracheostomy and can maintain the tract in case reinsertion is needed.
Surgical Techniques
A number of surgical techniques are also used (by our surgical colleagues) to create a tracheostomy.
These include:
These include:
- Horizontal slit - a horizontal (or T-shaped) slit between tracheal rings 2 and 3. Silk stitches are applied to the trachea above and below this to bring it anterior and maintain patency as needed for tube changes (these are usually removed around day 7). Pulling to sutures opens up the stoma.
- Window - removal of part of the anterior wall creates a more permanent stoma
- Vertical slit - a U or H-shaped opening into the trachea with similar application of stitches to maintain patency and allow further opening of the stoma if needed. Probably the most common approach.
- Bjork flap - a flap of anterior tracheal wall is brought out and sutured to the skin, creating a ramp. Pulling the suture will tear the flap
Surgical techniques often result in a more established tract being formed.
As such, the tract is often established by 2-3 days.
In contrast, the formation of a tract from a percutaneous technique arises from the pressure of the tube on the tissues (almost a pressure necrosis effect), and takes about 7-10 days to occur.
As such, the tracheostomy tube shouldn’t be changed over this time period to avoid the risk of the tract closing up.
Tracheostomy Emergencies
These are not uncommon, and can be challenging to manage, partly due the decreased familiarity compared to other airways.
This can be rapidly fatal and needs swift, effective management.
This can be rapidly fatal and needs swift, effective management.
Essentially 3 problems can occur with a tracheostomy (or any artificial airway):
- Blockage
- Partial displacement
- Complete displacement
The National Tracheostomy Safety Project (NTSP) provides a structured, algorithm based approach to dealing with such emergencies.
The essential principles of management comprise of:
The essential principles of management comprise of:
- Getting help
- Establishing whether the patient has a patent upper airway
- Has there been a laryngectomy?
- Is there a known difficult airway?
- Has there been a laryngectomy?
- Applying oxygen - to both tracheostomy and face
- Establishing the patency of the tracheostomy
- Capnography
- Mapleson C
- Passing a suction catheter
- Capnography
- Ventilating the patient.
Because of the wide range of variations between patients, an algorithm led approach is advocated.
There are two main algorithms; one for patients with a laryngectomy, one for those with a patent normal anatomy.
You can view and download these here
There are two main algorithms; one for patients with a laryngectomy, one for those with a patent normal anatomy.
You can view and download these here
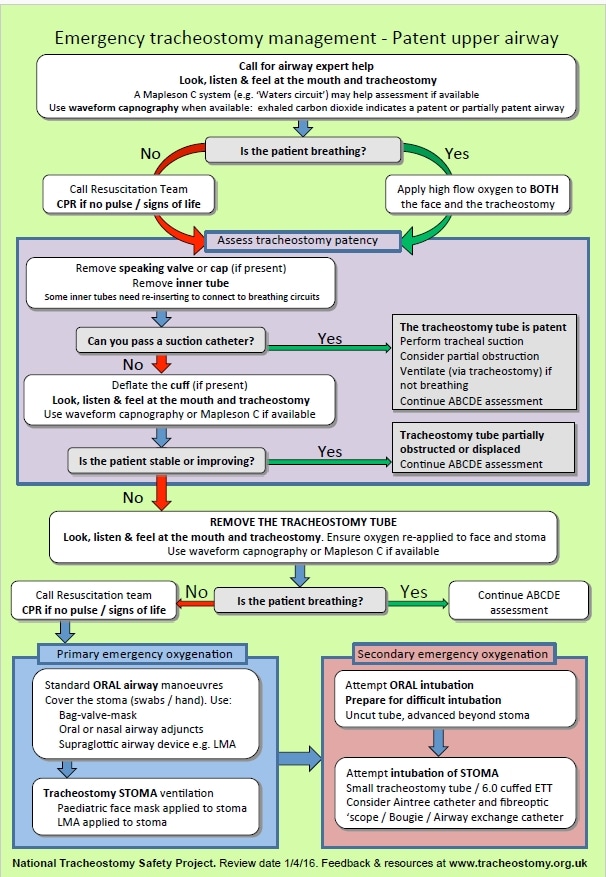
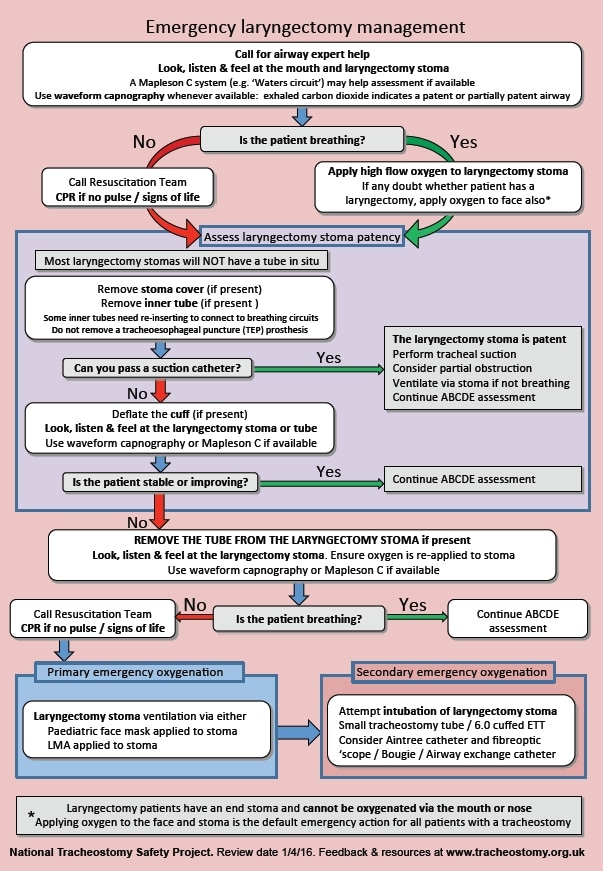
These algorithms are reproduced with permission - 'The Association of Anaesthetists of Great Britain & Ireland grants readers the right to reproduce the algorithms included in this article (Figs 1 and 2) for non-commercial purposes (including in scholarly journals, books and non-commercial websites), without the need to request permission. Each reproduction of any algorithm must be accompanied by the following text: Reproduced from McGrath BA, Bates L, Atkinson D, Moore JA. Multidisciplinary guidelines for the management of tracheostomy and laryngectomy airway emergencies. Anaesthesia. 2012 Jun 26. doi: 10.1111/j.1365-2044.2012.07217, with permission from the Association of Anaesthetists of Great Britain & Ireland/Blackwell Publishing Ltd'
There are a number of red flags which may indicate impending problems.
These should be considered in those patients with a tracheostomy that aren’t quite right.
Airway - Escape of air from mouth (or even speaking), snoring, grunting, stridor.
Breathing - Apnoea (clinical or via capnography), Ventilatory challenge (high airway pressures, low tidal volumes, accessory muscle use, tachypnea), hypoxia.
Circulation - tachycardia, hypotension.
Disability - agitation, depressed GCS, pain at tube
Exposure (trache specific) - regular cuff inflation needed, visibly displaced, excess secretions.
Timing of Tracheostomy
This is a challenging topic, and it seems to be without a clear answer currently.
The aim of a tracheostomy in critical care is to progress a patient’s care forward and wean the support they are needing.
However, in many cases, patients are extubated without a need for a tracheostomy (this proportion is lower in neuroscience centres).
The question is therefore deciding when is the time that harms/risks of performing a tracheostomy (which aren’t insignificant) are outweighed by the benefits e.g. reduction in sedation, improved respiratory mechanics.
The TracMan trial was a large RCT that aimed to look at this question.
It compared early (4 days) vs late (10 days) tracheostomy.
There was no difference in the primary outcome (30 day mortality) between the groups.
The incidence of complications with tracheostomy insertion was 6.3%.
This suggested that there is no benefit from early insertion, as many patients in the control group didn’t end up needing a tracheostomy.
Last updated: 12th April 2017
Tom Heaton
Tom Heaton
Links & References
- Whaley, A. 2016. Tracheostomy: indications and techniques. e-LFH. Available at: e-lfh.org.uk
- Whaley, A. 2016. Types of tracheostomy tube. e-LFH. Available at: e-lfh.org.uk
- McGrath, B. 2016. Tracheostomy 1: Basic knowledge about tracheostomies and laryngectomies. e-LFH. Availble at: e-lfh.org.uk
- www.tracheostomy.org.uk. National Tracheostomy Safety Project.
- Young, D. et al. Effect of Early vs Late Tracheostomy Placement on Survival in Patients Receiving Mechanical Ventilation:The TracMan Randomized Trial. 2013. JAMA. 309(20):2121-2129. Available at: http://jamanetwork.com/journals/jama/fullarticle/1690674
- Chambler, D. TracMan. The Bottom Line. 2014. Available at: http://www.thebottomline.org.uk/summaries/icm/tracman/
- Nickson, C. Tracheostomy complication. Life in the Fast Lane. Available at: https://lifeinthefastlane.com/ccc/tracheostomy-complications/
- Crit IQ. Youtube. 2012. https://www.youtube.com/watch?v=1-dcY42APoo
- Jonathan Sanah. Youtube. 2013. https://www.youtube.com/watch?v=D95t8N6oADI
- Nickson, C. Percutaneous Tracheostomy. Life in the Fast Lane. 2015. Available at: https://lifeinthefastlane.com/ccc/percutaneous-tracheostomy/
- Nickson, C. Timing of tracheostomy. Life in the Fast Lane. 2013. Available at: https://lifeinthefastlane.com/ccc/timing-of-tracheostomy/
